Custom t-shirts have never been more popular. Whether you want to create something unique for yourself, design matching shirts for an event, or even start a small side hustle, making your own shirts at home is easier than most people think.
You don’t need expensive equipment or a full print shop setup. With the right materials and a simple process, you can turn your ideas into wearable designs in just a few steps.
This guide will walk you through everything you need to know—from designing your shirt to applying your print—so you can get professional-looking results at home.
Why Make Custom T-Shirts at Home?

Before jumping into the process, it’s worth understanding why this is such a popular option.
Making your own shirts gives you:
- Complete creative control over your design
- Cost savings compared to ordering custom prints
- Flexibility to make one shirt or many
- The ability to test ideas if you’re considering selling
It also removes the wait time and limitations that come with ordering from a print service.
What You’ll Need
To get started, you don’t need much. Most of the items are things you may already have or can easily get.
Here’s a simple list:
- A blank t-shirt (cotton works best)
- A printer (inkjet is most common)
- Transfer paper
- An iron or heat press
- Scissors or a cutting tool
- A hard, flat surface
Once you have these basics, you’re ready to begin.
Step 1: Choose the Right T-Shirt
The quality of your shirt matters more than you might think.
For best results:
- Choose 100% cotton or a cotton blend
- Avoid heavily textured fabrics
- Stick with lighter colors if you’re using standard transfer paper
A smooth, high-quality shirt helps the design transfer more cleanly and last longer.
Step 2: Create or Choose Your Design
This is where you can get creative.
You can:
- Design something from scratch using tools like Canva or Photoshop
- Use pre-made graphics or templates
- Add text, logos, or photos
A few tips for better results:
- Keep your design high resolution
- Avoid overly thin lines or tiny details
- Make sure the size fits your shirt placement
Also, remember that your design may need to be mirrored (flipped horizontally) before printing, depending on the transfer method you’re using.
Step 3: Print Your Design
Once your design is ready, it’s time to print.
This step is where your materials make a difference.
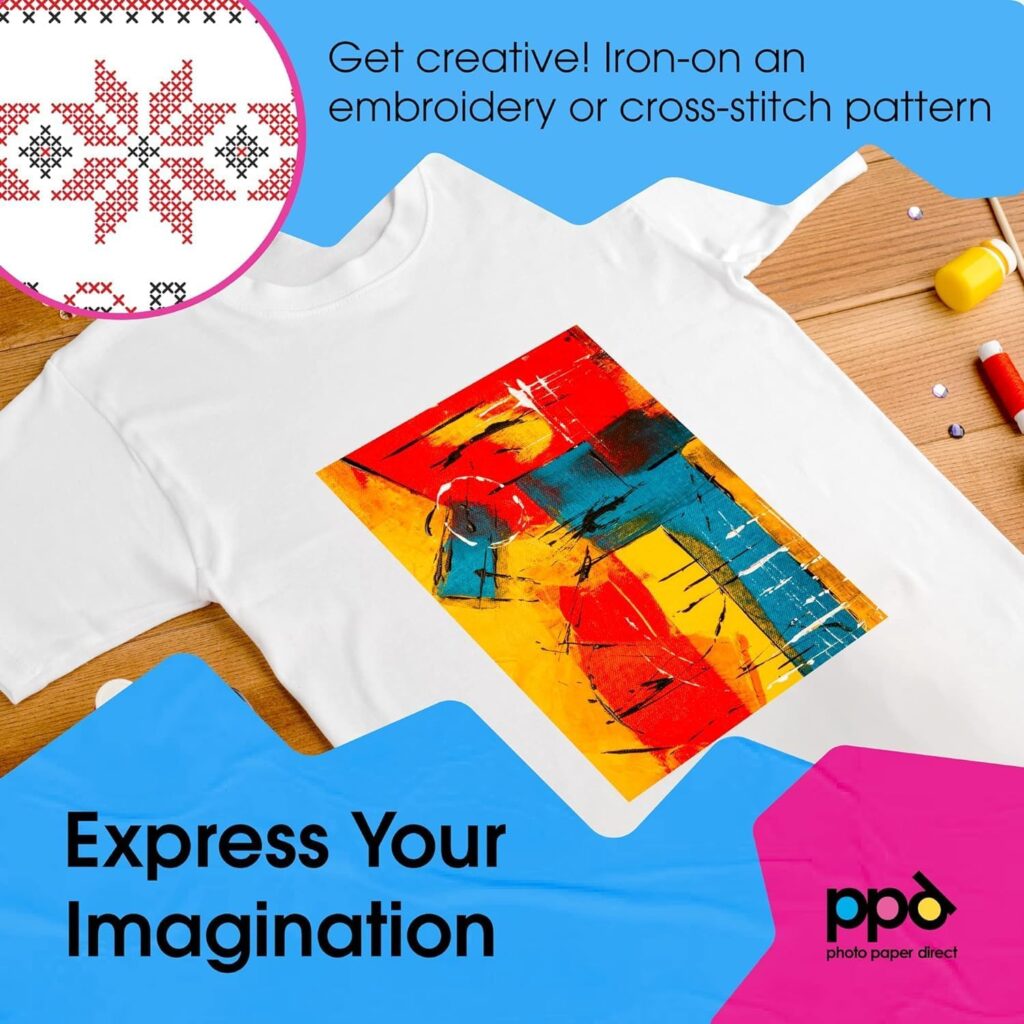
Using high-quality transfer paper is key to getting a clean, vibrant result. For example, options like the iron-on transfer paper from Photo Paper Direct are specifically designed for inkjet printers and work especially well on black and dark fabrics, where getting bold colors can be more challenging. Their PPD 11×17″ sheets give you more space for larger designs or multiple prints at once, while still being easy to use with a standard home iron or heat press. The paper is made to deliver strong color payoff, solid adhesion, and a smooth finish that holds up well over time, making it a reliable choice whether you’re just getting started or aiming for more polished, professional-looking results at home.
When printing:
- Set your printer to high quality
- Use the correct paper settings
- Let the print fully dry before handling
Taking your time here helps avoid smudges and ensures the design transfers properly.
Step 4: Prepare Your Workspace
Before applying the design, you’ll want to set up a proper workspace.
You’ll need:
- A flat, heat-resistant surface (like a table or ironing board)
- No wrinkles or uneven areas under the shirt
- A clean environment free of dust or debris
Lay your shirt flat and smooth out any wrinkles. If needed, lightly iron it first to create a clean surface.
Step 5: Position Your Design
Carefully place your printed design onto the shirt.
Make sure:
- It’s centered and aligned properly
- The correct side is facing down (for transfer paper)
- There are no folds or bubbles
Take your time with this step. Once heat is applied, it’s difficult to reposition.
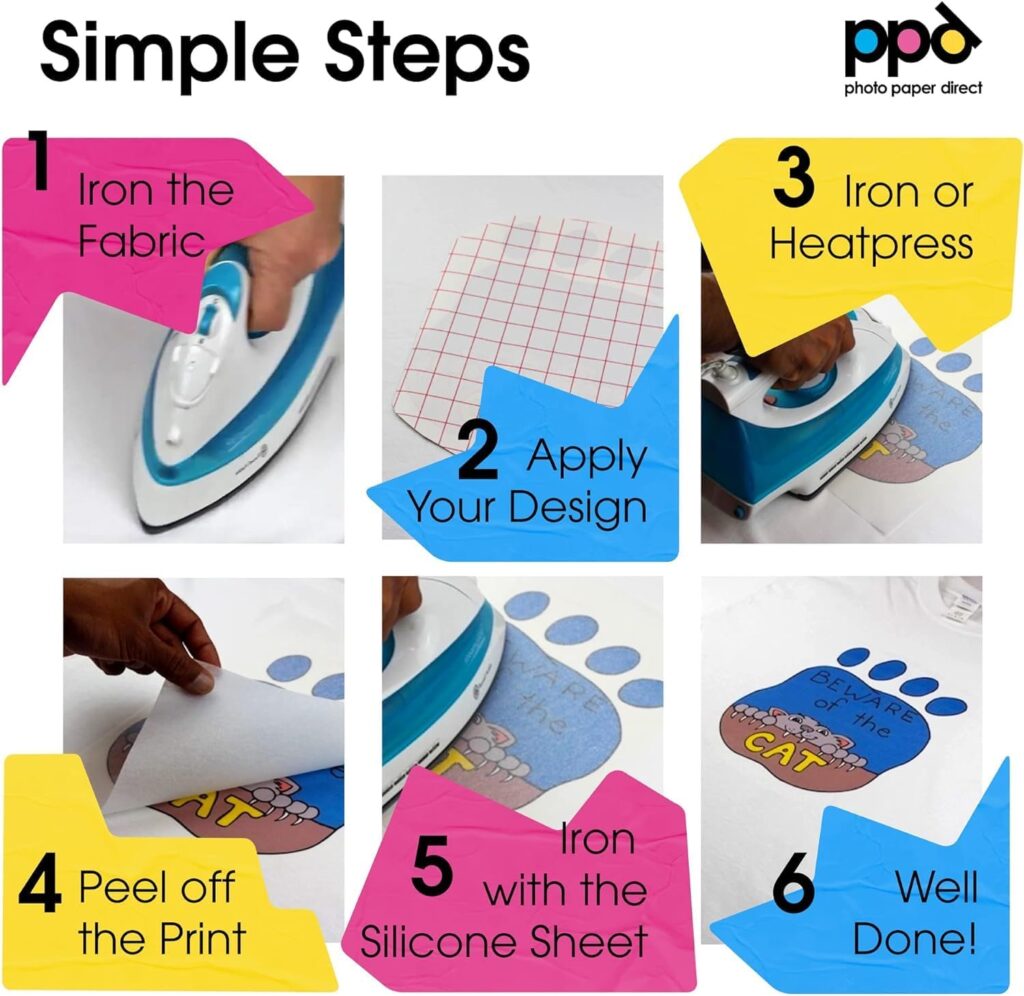
Step 6: Apply Heat
This is where the design bonds to the fabric.
Using an iron:
- Set it to a high heat setting (no steam)
- Apply firm, even pressure
- Move slowly across the entire design
If you’re using a heat press:
- Follow the recommended temperature and time settings
- Apply consistent pressure
The goal is to ensure the entire design receives even heat so it transfers fully.
Step 7: Let It Cool and Peel
After applying heat, allow the shirt to cool slightly.
Then carefully peel away the backing paper.
Go slowly and check that the design has fully transferred. If any areas didn’t stick, you can reapply heat briefly.
Step 8: Final Touches
Once the backing is removed, your shirt is nearly done.
For best results:
- Let the shirt sit for a few hours before wearing
- Wait at least 24 hours before washing
- Wash inside out to preserve the design
These small steps help extend the life of your custom print.
Tips for Better Results
If you want your shirts to look more professional, these tips make a big difference:
- Use high-quality images for sharper prints
- Avoid overloading with ink to prevent bleeding
- Apply even pressure during heat transfer
- Test on a sample shirt first if possible
Like anything, the more you practice, the better your results will get.
Common Mistakes to Avoid
Even though the process is simple, there are a few common mistakes that can affect your results.
Using Low-Quality Paper
Cheap or thin paper can lead to faded prints, peeling, or poor transfer. Investing in better materials improves everything.
Skipping the Mirroring Step
If your design includes text, forgetting to mirror it will result in backwards printing.
Uneven Heat Application
If some areas get more heat than others, the design may not transfer properly.
Washing Too Soon
Washing the shirt before the design fully sets can damage the print.
Can You Turn This Into a Business?
Absolutely.
Many people start by making shirts for themselves and end up turning it into a small business.
With minimal startup costs, you can:
- Sell custom designs online
- Create shirts for events or local groups
- Test different styles and niches
Transfer paper methods are especially useful for beginners because they don’t require large upfront investments.
Final Thoughts
Making custom t-shirts at home is one of the easiest ways to bring your ideas to life.
With just a few tools and a simple process, you can create designs that feel personal, creative, and completely your own.
Whether you’re making one shirt or planning something bigger, the key is starting with the right materials and taking your time with each step.
Once you get the hang of it, it becomes a skill you can use again and again—for gifts, projects, or even a business.
And the best part? You don’t need a factory or expensive equipment to do it. Just a little creativity and the willingness to try.